Like most things development-related, custom theme development for WordPress comes with its own set of slow, repetitive tasks that you’ll find yourself doing over and over during the course of your coding sessions. This can be anything from having to constantly refresh browsers, to manually compiling stylesheets that you’ve created using a preprocessor language, to even having to save theme imagery in a second format for compatible devices. While theses tasks may not take a considerable amount of time by themselves, they can have a significant impact across the life of a project and really slow you down. Thankfully, there’s a great solution for automating these tasks and reclaiming your time.
In this tutorial, I’m going to walk you through implementing Gulp into your theme development workflow. Gulp is a highly flexible toolkit that will allow you to automate nearly any repetitive process that you can think of. While I’ll go over how to set up some basic tasks, I highly recommend that you check out Gulp’s plugin directory after going through the tutorial. Chances are, you’ll find a plugin (or several) to help automate tasks unique to your workflow.
In terms of the tasks that I’ll walk through in this tutorial, we’ll be going through ones to:
- Combine and minify javascript libraries used by your theme
- Compile and minify your theme’s stylesheet
- Convert svg paths in your stylesheet to inlined svgs
- Start a Browsersync session and reload/update any connected browsers when theme files are changed
- Watch all .scss files in your theme directories and automatically recompile the theme stylesheet anytime one of these files is changed
Prerequisites
- Node / NPM (latest version)
- Gulp CLI
- Dart SDK (For Dart SASS)
- You should already have a local dev environment in place and can preview your WordPress site at a local URL, such as http://mysite.test or http://mysite.test:8080
Some Assumptions & Considerations
- When building a theme, I put all of the theme’s styles in theme.scss (which compiles down to theme.css/theme.min.css) instead of using the traditional style.css file. The style.css file still exists, but only contains the required theme information header. This slightly helps performance, as WordPress doesn’t have to pull all of your theme’s styles every time it searches style.css for theme information. If you want to keep everything in style.css, simply change all references in gulpfile.js to reference
style.css / style.min.css / style.scssinstead oftheme.css / theme.min.css / theme.scss. - This tutorial assumes that you’re using SASS as your CSS preprocessing language of choice, and that all scss files you intend to compile are imported into your theme stylesheet, and not compiled as separate files.
- While I use MacOS for development, this tutorial should work for Linux and Windows environments.
Step 1: Create Required Files
First, we need to create a couple of files to get up and running, all in the root directory of our theme. These files are: package.json, gulpfile.js
package.json
We’ll start by creating a package.json file. In this file, you’ll provide some information about your project (aka, theme), and list the dependencies you’ll need for the gulp tasks that we’ll eventually be creating. Below is a template you can use for this file, based on the one that ships with Method.
{
   "name": "your-theme",
   "version": "theme-version",
   "description": "A description of your theme.",
   "main": "index.js",
   "scripts": {
     "test": "echo \"Error: no test specified\" && exit 1"
   },
   "author": "Your Name",
   "license": "LGPL",
   "devDependencies": {
     "browser-sync": "^2.26.3",
     "gulp": "^4.0.0",
     "gulp-autoprefixer": "^4.0.0",
     "gulp-clean-css": "^4.3.0",
     "gulp-concat": "^2.6.1",
     "gulp-dart-sass": "^0.9.1",
     "gulp-notify": "^3.0.0",
     "gulp-postcss": "9.0.0",
     "gulp-rename": "^1.2.2",
     "gulp-uglify": "^3.0.0",
     "postcss-assets": "5.0.0"
   }
 }
gulpfile.js
Next, we’ll create gulpfile.js, and include all of our dependencies so that we can use them in our gulp tasks.
var gulp = require('gulp'),
sass = require('gulp-dart-sass'),
autoprefixer = require('gulp-autoprefixer'),
uglify = require('gulp-uglify'),
rename = require('gulp-rename'),
concat = require('gulp-concat'),
notify = require('gulp-notify'),
browserSync = require('browser-sync').create(),
cleanCSS = require('gulp-clean-css'),
postcss = require('gulp-postcss'),
assets  = require('postcss-assets');
Step 2: Install Dependencies
Now that we’ve declared the dependencies that we’ll need to make our gulp tasks work, it’s time to install them. In the terminal/command shell, navigate to your theme folder, where the package.json file that you just created is located, and run the following command:npm install --save-dev
This will install all of the dependencies listed in package.json into the node_modules/ subdirectory of your theme.
Step 3: Create Gulp Tasks
Now that we’ve got our files set up and dependencies installed, it’s time to create some tasks! All of these will be added to the bottom of gulpfile.js, below the includes we added to the file in Step 1.
Combine & Minify Scripts
We’ll start out by creating a task to combine and minify all of our theme’s javascript libraries into a single file, scripts.min.js, which will be stored in the assets/js/ subdirectory.
Below is the final code for the task:
gulp.task('scripts', function() {
    return gulp.src(['inc/bootstrap/js/bootstrap.bundle.js','inc/matchHeight/jquery.matchHeight.js','inc/jarallax/jarallax.js','inc/granim/granim.js'])
      .pipe(concat('assets/js/scripts.js'))
      .pipe(gulp.dest('.'))
      .pipe(rename({suffix: '.min'}))
      .pipe(uglify())
      .pipe(gulp.dest('.'))
      .pipe(notify({ message: 'Scripts task complete' }));
});
In terms of the important lines for this task…
gulp.src(['inc/bootstrap/js/bootstrap.bundle.js','inc/matchHeight/jquery.matchHeight.js','inc/jarallax/jarallax.js'])Here, we’re specifying which javascript libraries to combine and minify. In my case, I’m including Bootstrap (bundled with popper), matchHeight, and Jarallax. Regardless of which libraries you specify, you should include the path to the full, unminified version of each library. Minifying minified js doesn’t tend to work well.
.pipe(concat('assets/js/scripts.js'))Here, we’re specifying the path to save our combined js file. The minified version will be saved to the same directory, using the same name (but with .min prepended to the file extension). For example, if you changed the path to 'js/theme-scripts.js', the minified version would be saved to 'js/theme-scripts.min.js'
Compile & Minify Theme Styles
Next, we’ll create a task to compile theme.scss, which contains all of our theme’s styles and other scss includes, down into a usable css file, theme.css. Once compiled, a minified version of the file will be created. We’ll also use autoprefixer to ensure that our stylesheets contain all relevant browser prefixes, so that our css is optimized to work well across all modern browsers.
Below is the final code for the task. This task will compile theme.scss to theme.css, add missing browser-specific prefixes to theme.css via autoprefixer, and then use cleanCSS to create a minified version of the file, theme.min.css:
gulp.task('compile-styles', function() {
    return gulp.src('./theme.scss')
      .pipe(sass({outputStyle: 'expanded'}).on('error', sass.logError))
      .pipe(autoprefixer('last 2 versions'))
      .pipe(gulp.dest('.'))
      .pipe(rename({suffix: '.min'}))
      .pipe(cleanCSS('level: 2'))
      .pipe(gulp.dest('.'))
      .pipe(browserSync.stream())
      .pipe(notify({ message: 'Styles task complete' }));
  });
Let’s go through the important lines…
return gulp.src('./theme.scss')Here, we’re setting the source scss file. This is the file where you’re writing your theme’s css/scss. As mentioned earlier, I use theme.scss, but if you want to compile down into style.css, keep your styles in style.scss and change this line to reflect that.
.pipe(autoprefixer('last 2 versions'))Once our styles have been compiled into theme.css, we’re running the file through autoprefixer, which will find any property with an alternate browser prefix and add that prefix to the file, maximizing cross-browser compatibility. We’re limiting the scope to the last 2 versions of each browser, but this can be changed to cast a wider net if needed. You can view a full list of possible queries here.
.pipe(cleanCSS('level: 2'))Here, we’re using cleanCSS to generate a minified version of the theme.css file, which will be saved to theme.min.css. For cleanCSS, we’re using optimization level 2, which in some cases can lead to compatibility issues, as it is the most aggressive optimization level available. Change the level to 1 if you encounter any problems. More on cleanCSS optimization levels here.
.pipe(browserSync.stream())If at least one Browsersync session is active, this will update active sessions with updated CSS without triggering a browser reload. Otherwise, it will do nothing.
Inline SVGs Referenced in Compiled Stylesheets
Now that we’ve created a task to compile our theme.scss file into css, we can take optimizations a step further by creating a task to search our new css files for any paths pointing to svg files, and inline the svgs directly into our css files instead of requiring site visitors to load the svgs as separate assets. This is optimal, as inlining svg assets will, in most cases, have minimal impact on the file size of our css files, and can greatly decrease the number of requests a visitor’s browser will need to make to load our site. This means better performance and lower pageload times.
Below is the final code for this task:
gulp.task('process-styles', function () {
    return gulp.src(['./theme.css','theme.min.css'])
      .pipe(postcss([assets({
        loadPaths: ['inc/bootstrap-icons/','assets/images/']
      })]))
      .pipe(gulp.dest('.'));
  });
In terms of the important lines…
return gulp.src(['./theme.css','theme.min.css'])Here, we’re specifying which CSS files we want to search for svg paths and rewrite with inlined svgs. If using style.css, change this line to reflect that.
loadPaths: ['inc/bootstrap-icons/','assets/images/']Here, we’re specifying the paths to directories where our svg assets are stored. Only svgs from these subdirectories will be inlined. Here, you’ll most likely need to change this line to include the path to the directory where you store your theme’s image assets.
Run combine-styles, Then process-styles On Completion
Now, we’ll create a single task to run combine-styles, and then process-styles, using a series. Because process-styles processes our compiled css files, it needs to be executed after the combine-styles task completes. Simply running gulp combine-styles process-styles from the terminal would execute both tasks simultaneously, which wouldn’t work, as process-styles would attempt to process css files that were in the middle of being regenerated. Instead, we’ll create a styles task that executes one, and then the other upon the first task’s completion:
gulp.task('styles', gulp.series('compile-styles', 'process-styles'));Start A Browsersync Session, Reload Browsers on Change
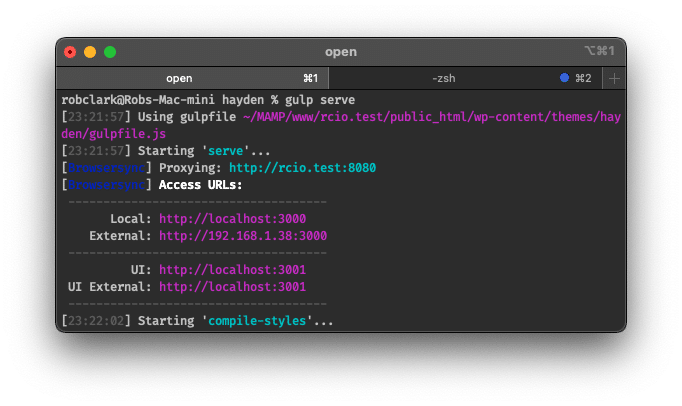
Next, we’ll create a task to start a Browserstack session, and refresh any connected browsers when theme files are changed. Browsersync is an awesome utility that will make your site available at http://localhost:3000, as well as port 3000 on your local network IP address, allowing you to preview your site on multiple network devices. If viewing the same page on multiple devices, scroll position will be synced in every browser, and navigating to a new page in one browser will cause other browsers to follow. Essentially, you can drive multiple browsers across multiple devices from a single window. Anytime a theme file is modified, changes will immediately be reflected across all browsers. It’s a great way to see dev changes in real time, and test on mobile devices.

It’s worth noting that Browsersync has many options that you can tweak to fine-tune browser syncing and other behaviors. A good starting place on how to modify options can be found here. Once Browsersync is running, you can also modify sync settings by visiting http://localhost:3001
Below is the final code for this task. Basically, we’re firing up Browsersync, using your site’s local dev address as a proxy, then watching all theme assets for changes, and updating connected browsers with new changes.
gulp.task('serve', function() {

    browserSync.init({
        proxy: "mysite.test"
    });

    gulp.watch(['./**/*.scss', '!./node_modules/', '!./.git/'], gulp.series('compile-styles', 'process-styles'));

    gulp.watch(['./**/*.*', '!./node_modules/', '!./.git/', '!./**/*.scss', '!./theme.css', '!./theme.min.css']).on('change', browserSync.reload);

});
Going through the important lines…
proxy: "mysite.test"On this line, we’re providing the local development address for our site as a proxy for Browsersync. Change this to reflect your site’s local dev address.
gulp.watch(['./**/*.scss', '!./node_modules/', '!./.git/'], gulp.series('compile-styles', 'process-styles'));Once Browsersync is up and running, we’re watching all of the theme’s scss files, and recompiling theme.scss when any of them are changed. Because the compile-styles task updates any browsers connected with updated CSS, there’s no need to reload the page when scss files are changed. We’re excluding node_modules/ and .git/ from being scanned for changes, as no relevant files are in those directories, and scanning them can have a noticeable impact on performance over time.
gulp.watch(['./**/*.*', '!./node_modules/', '!./.git/', '!./**/*.scss', '!./theme.css', '!./theme.min.css']).on('change', browserSync.reload);We’re also scanning all other files for changes, and reloading connected browsers when any changes are detected. As with the previous line, node_modules/ and .git/ are being excluded from scanning, as well as all scss files and compiled theme stylesheets, which are covered by the previous line.
Watch .scss Files & Recompile Theme Styles on Change
Finally, we’ll create a task to watch all of our theme’s scss files, and recompile the theme stylesheet when any scss files are changed. This can be useful when you want to ensure that any scss changes you make are taken into account, but don’t want to use Browsersync.
gulp.task('watch', function() {
    gulp.watch(['./**/*.scss', '!./node_modules/', '!./.git/'], gulp.series('compile-styles', 'process-styles'));
});
The End Result
At this point, your gulpfile should look similar to the one below, aside from modifications to account for your local dev environment, etc:
var gulp = require('gulp'),
sass = require('gulp-dart-sass'),
autoprefixer = require('gulp-autoprefixer'),
uglify = require('gulp-uglify'),
rename = require('gulp-rename'),
concat = require('gulp-concat'),
notify = require('gulp-notify'),
browserSync = require('browser-sync').create(),
cleanCSS = require('gulp-clean-css'),
postcss = require('gulp-postcss'),
assets  = require('postcss-assets');

gulp.task('scripts', function() {
    return gulp.src(['inc/bootstrap/js/bootstrap.bundle.js','inc/matchHeight/jquery.matchHeight.js','inc/jarallax/jarallax.js','inc/granim/granim.js'])
      .pipe(concat('assets/js/scripts.js'))
      .pipe(gulp.dest('.'))
      .pipe(rename({suffix: '.min'}))
      .pipe(uglify())
      .pipe(gulp.dest('.'))
      .pipe(notify({ message: 'Scripts task complete' }));
});

gulp.task('process-styles', function () {
    return gulp.src(['./theme.css','theme.min.css'])
      .pipe(postcss([assets({
        loadPaths: ['inc/bootstrap-icons/','assets/images/']
      })]))
      .pipe(gulp.dest('.'));
  });

gulp.task('compile-styles', function() {
    return gulp.src('./theme.scss')
      .pipe(sass({outputStyle: 'expanded'}).on('error', sass.logError))
      .pipe(autoprefixer('last 2 versions'))
      .pipe(gulp.dest('.'))
      .pipe(rename({suffix: '.min'}))
      .pipe(cleanCSS('level: 2'))
      .pipe(gulp.dest('.'))
      .pipe(browserSync.stream())
      .pipe(notify({ message: 'Styles task complete' }));
  });

gulp.task('styles', gulp.series('compile-styles', 'process-styles'));

gulp.task('serve', function() {

    browserSync.init({
        proxy: "mysite.test"
    });

    gulp.watch(['./**/*.scss', '!./node_modules/', '!./.git/'], gulp.series('compile-styles', 'process-styles'));

    gulp.watch(['./**/*.*', '!./node_modules/', '!./.git/', '!./**/*.scss', '!./theme.css', '!./theme.min.css']).on('change', browserSync.reload);

});

gulp.task('watch', function() {
    gulp.watch(['./**/*.scss', '!./node_modules/', '!./.git/'], gulp.series('compile-styles', 'process-styles'));
});
Step 4: Using Gulp Tasks
Now that we’ve got all the files in place and our tasks created, we can start to use our gulp tasks to speed up our workflow! To run any of the tasks that we just created, navigate to the root folder of your theme in the terminal and type gulp, followed by a space and the name of the task you wish to run. For example, to run the styles task, you’d use the following command:
gulp styles
You can also run multiple tasks simultaneously. For example, when pulling in new theme revisions from my GitLab server, I run the following command to ensure that my stylesheet and script files are up to date:
gulp scripts styles
When using the watch and serve tasks, the tasks will run until you manually end them. To do this, use control+C (this may differ, depending on your terminal application and environment).
Additional Considerations
.gitignore
If you are using git to track changes to your theme (which I highly recommend doing), add the following items to your .gitignore file to prevent files intended only for local development from making it into your repo…
.sass-cache/
node_modules/
package-lock.json
If you are uploading your theme via ftp/sftp or have a deployment process that supports compiling css and javascript assets during deployment, I’d also recommend adding these items, especially if working on a team (filenames and paths may differ, depending on changes you made to the gulpfile):
theme.css
theme.min.css
assets/js/scripts.js
assets/js/scripts.min.js
An example of a GitLab CI deployment process that’s been configured to compile theme assets can be found here. As I alluded to above, opting to keep the compiled stylesheets and combined script files untracked is particularly beneficial when working on a team, as by doing so, you will avoid having to deal with annoying merge conflicts with those files.
If Uploading Your Theme…
If you plan to upload your theme via ftp or sftp, make sure to exclude the node_modules/ and .sass-cache/ directories from upload. If you’re developing on a Mac, Transmit can easily be configured to always exclude these directories via File Rules.
Conclusion
If all went well, you should now be up and running with Gulp! I hope this helped you reclaim some of your time and sanity, and make sure to check out Gulp’s plugin directory to discover more ways to automate your workflow. Happy coding!
Comments
There are currently no comments for this post.